Fixing a Burnt Coil Taste: Prevention and Priming Techniques
Few sensations in vaping are as jarring—or as instantly memorable—as inhaling a full-force burnt coil hit. One moment you expect cool, sweet watermelon ice or rich vanilla cream; the next, an acrid blast of scorched cotton hits the back of your throat like inhaling campfire smoke through a straw. Fixing a Burnt Coil Taste: Prevention
When that unmistakable charred taste strikes, your immediate instinct is to wonder if the coil can be saved—or why a brand-new pod or sub-ohm coil you installed ten minutes ago already tastes ruined. Fixing a Burnt Coil Taste: Prevention
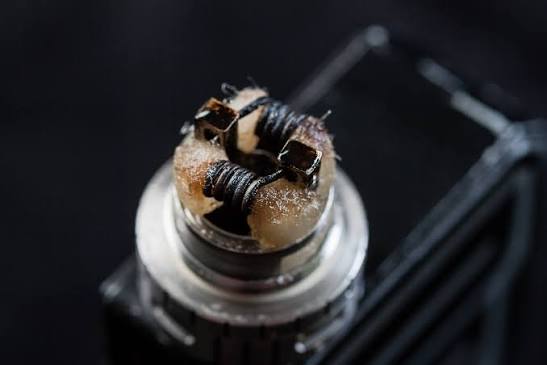
To solve the problem permanently, you have to understand what happens inside your atomizer at 200°C (392°F). Every modern vape coil wraps a precision-etched FeCrAl or stainless steel mesh heating grid tightly inside layers of unbleached organic Japanese cotton. As long as that cotton stays saturated with e-liquid, heat transfers safely into vaporizing fluid. The instant the cotton runs dry—even for half a second—the metal mesh glows bright orange, scorching the cellulose fibers permanently. Fixing a Burnt Coil Taste: Prevention
In this comprehensive editorial guide on Fixing a Burnt Coil Taste: Prevention and Priming Techniques, we give you an honest, science-backed verdict on when a dry coil can be rescued versus when it must be tossed, walk you through exact priming workflows for both sub-ohm tanks and refillable pods, and share seven daily habits that double coil longevity. Fixing a Burnt Coil Taste: Prevention
1. Scorched Cotton vs. Caramelized Gunk: Can You Save a Burnt Coil?
Before wasting an afternoon boiling coils in vodka or rinsing pods in tap water, separate the three distinct types of “burnt” taste. Only the first type can be rescued without replacing your hardware: Fixing a Burnt Coil Taste: Prevention
  DIAGNOSING BURNT COIL TASTE: RESCUABLE VS. PERMANENT DAMAGE

  [ Stage 1: Mild "Dry Hit" (Cotton Slightly Starved, Not Charred) ]
  Taste: Faintly warm, papery, or dry cotton note; zero black smoke harshness.
  Verdict: RESCUABLE! Stop firing immediately, top off juice, take primer puffs & lower wattage.

  [ Stage 2: Sweetener Caramelization (Sucralose Crust on Mesh) ]
  Taste: Heavy, muted, dark burnt-sugar bitterness after 5–14 days of sweet e-liquid.
  Verdict: REPLACE COIL. Baked carbon crust insulates the mesh and taints tank liquid.

  [ Stage 3: True Cotton Scorch (Dry-Fired Mesh Grid) ]
  Taste: Sharp, acrid, throat-stinging charred cotton ash (often on a brand-new coil).
  Verdict: PERMANENT DAMAGE. Carbonized cotton fibers cannot be un-burned—discard immediately.
Why Rinsing or Boiling Scorched Coils Never Works
You will occasionally see online hacks suggesting you soak a burnt coil in warm water, vinegar, or isopropyl alcohol overnight to “clean” it. While rinsing can wash away surface sweetener residue, it cannot repair physically burned cotton. Once organic cotton chars into black carbon, those fibers crumble internally, lose capillary wicking ability, and continue tasting like ash until the coil is replaced. Fixing a Burnt Coil Taste: Prevention
2. How to Rescue a Mild Dry Hit (Before It Turns Permanently Burnt)
If you just took a puff that tasted faintly dry, warm, or papery—before full-blown charred harshness hit—stop pressing the fire button immediately and run this 3-minute rescue sequence: Fixing a Burnt Coil Taste: Prevention
  3-MINUTE DRY-HIT RESCUE SEQUENCE

  [ 1. Stop Firing Immediately ] ──► [ 2. Top Off Tank & Release Airlocks ] ──► [ 3. 4 Unpowered Primer Puffs ] ──► [ 4. Drop Wattage -15% ]
Hands Off the Fire Button: Do not take a “test puff” to see if it still tastes dry—that second puff is what turns recoverable dry cotton into permanently scorched cotton.
Fill the Tank & Burp Trapped Air Bubbles: Top your tank or pod up to 85% capacity. If you see tiny air bubbles clinging to the white cotton intake windows, gently tilt the tank side-to-side or open the top fill cap for three seconds to equalize internal vacuum pressure so liquid rushes into the wick. Fixing a Burnt Coil Taste: Prevention
Take 4 Unpowered “Primer Puffs”: Without pressing the fire button (or with the pod removed from an auto-draw battery), place your lips on the mouthpiece and take three or four medium draws. This creates gentle negative pressure inside the chamber, pulling fresh e-liquid deep into the inner cotton layers. Fixing a Burnt Coil Taste: Prevention
Let It Rest 8 Minutes & Lower Wattage: Set the device upright for eight full minutes, drop your wattage by 5W to 10W (for box mods), and take a short 1-second test draw. If the papery dryness is gone, you caught it in time.
- Fixing a Burnt Coil Taste: Prevention
3. Step-by-Step Coil Priming Techniques (Sub-Ohm Tanks & Pods)
More than 70% of premature burnt coils happen during the very first five minutes of installation because thick e-liquid hadn’t reached the innermost layer of cotton touching the heating mesh. Follow the exact priming ritual matched to your hardware: Fixing a Burnt Coil Taste: Prevention
Technique A: Priming Replaceable Sub-Ohm Mesh Coils (70/30 High-VG Juice)
  SUB-OHM COIL PRIMING PIPELINE (8–12 MINUTES TOTAL)

  [ Step 1: Drip on Side Ports ] ──► [ Step 2: 2 Drops Inside Mesh ] ──► [ Step 3: Fill Tank 85% ] ──► [ Step 4: Wait 10 Mins + Step-Up ]
Drip Directly Onto External Wicking Windows: Hold your new sub-ohm coil head upright and place 1 to 2 drops of e-liquid directly onto each visible white cotton port around the metal barrel. Wait 15 seconds until the cotton absorbs the drops and turns translucent. Fixing a Burnt Coil Taste: Prevention
Drip 2 Drops Inside the Top Mesh Chimney: Tilt the coil slightly and drip 2 drops along the inner cotton wall (aiming at the cotton lining, not straight down the center air hole) to pre-wet the innermost layer touching the heating grid.
Assemble, Fill to 85% & Wait 10 Full Minutes: Screw or press the coil firmly into your tank base, fill the glass reservoir to 85%, and set a timer for 10 minutes. Thick 70/30 high-VG juice moves slowly—rushing this timer is the #1 cause of brand-new coil failure.
Use the “Wattage Step-Up” Break-In: Suppose your new coil is rated for 60W–80W. Start at 40W for your first three short puffs, step up to 50W for three puffs, and then settle into your 60W–65W sweet spot. Gradual heating seats the cotton evenly without thermal shock. Fixing a Burnt Coil Taste: Prevention
- Fixing a Burnt Coil Taste: Prevention
Technique B: Priming Refillable Pod Cartridges (50/50 Nic Salts)
Peel Off the Bottom Contact Sticker: Remove any clear protective film covering the bottom brass pins of your new pod cartridge.
Fill Slowly to 85% Capacity: Open the top or side silicone fill port, insert your 30mL unicorn bottle nozzle, and squeeze gently until the reservoir is 85% full—leaving a small air pocket at the top for proper vacuum wicking.
Wait 5 to 8 Minutes Upright: Because 50/50 VG/PG nic salt is much thinner than 70/30 sub-ohm liquid, capillary action saturates compact pod cotton faster. Still, give every brand-new pod at least 5 full minutes upright on your desk before inserting it into an auto-draw battery.
Take 3 Gentle Primer Puffs (Before Firing): Before clicking the pod onto the battery, take three gentle draws through the mouthpiece to confirm smooth airflow and full cotton saturation.
- Fixing a Burnt Coil Taste: Prevention
4. Master Troubleshooting Matrix: 7 Hidden Causes of Burnt Hits
Even when you prime a new coil carefully, everyday habits or mismatched settings can trigger sudden burnt hits days later. Use this diagnostic matrix to pinpoint and eliminate every hidden trigger: Fixing a Burnt Coil Taste: Prevention
+----------------------------------------------------------------------------------------------------+
|                      SEVEN HIDDEN CAUSES OF BURNT COIL TASTE & EXACT FIXES                         |
+------------------------------+-----------------------------------+---------------------------------+
| Hidden Cause                 | Why It Scorches Your Coil         | Immediate Permanent Fix         |
+------------------------------+-----------------------------------+---------------------------------+
| 1. Mismatched PG/VG Ratio    | Thick 70/30 high-VG juice cannot  | Use 50/50 VG/PG in 0.8Ω–1.2Ω    |
|    (Viscosity Bottleneck)    | enter tiny 1.3mm MTL pod ports.   | pods; save 70/30 for ≤0.6Ω coils|
+------------------------------+-----------------------------------+---------------------------------+
| 2. Chain-Vaping Back-to-Back | Taking 6+ consecutive puffs boils | Pause 20–30 seconds between     |
|    Without Cooling Pauses    | juice faster than cotton re-wicks.| draws so capillary flow catches up|
+------------------------------+-----------------------------------+---------------------------------+
| 3. Running Max Wattage Limit | Firing an 80W-max coil at 80W+    | Run 10%–15% below max rating    |
|    (Overheating Mesh Grid)   | vaporizes juice faster than intake| (e.g., 65W on a 60W–80W coil).  |
+------------------------------+-----------------------------------+---------------------------------+
| 4. Vaping Below Cotton Ports | Letting e-liquid drop below the   | Refill immediately whenever     |
|    (Exposed Upper Cotton)    | white intake holes leaves top dry.| liquid reaches the top of ports.|
+------------------------------+-----------------------------------+---------------------------------+
| 5. Over-Tightened Tank Seal  | Cranking top cap too tight blocks | Snug caps finger-tight; open top|
|    ("Vacuum Lock" Bubbles)   | air exchange, starving cotton.    | cap briefly to release bubbles. |
+------------------------------+-----------------------------------+---------------------------------+
| 6. Heavy Sucralose Sweeteners| Candied "bar salts" & dark custards| Rotate clean fruit/mint juices  |
|    (Caramelized Carbon Crust)| bake sugar onto mesh in 3–5 days. | to extend coil life to 2–3 wks. |
+------------------------------+-----------------------------------+---------------------------------+
| 7. Cold Winter Viscosity     | Temperatures below 45°F turn VG   | Warm device inside hands or coat|
|    (Sluggish Outdoor Flow)   | into thick, slow-moving syrup.    | pocket for 2 mins before drawing|
+------------------------------+-----------------------------------+---------------------------------+
5. Six Daily Habits That Double Coil & Pod Lifespan
Want every replacement pod or sub-ohm mesh coil to deliver crisp, clean flavor for two to three weeks instead of burning out every four days? Build these six habits into your daily routine: Fixing a Burnt Coil Taste: Prevention
Stay in the “Lower-Middle” Wattage Sweet Spot: Every coil barrel has a recommended range laser-etched onto the metal (for example,
Best: 55W–65W). Running at 55W–58W produces nearly identical flavor and cloud density as 65W while cutting thermal stress on the organic cotton by over 20%. Fixing a Burnt Coil Taste: PreventionKeep E-Liquid Above the 25% Line: Treat the top edge of your coil’s white cotton intake holes as your “empty” line. Refilling before the upper cotton ever sits exposed to air eliminates dry top-edge scorching completely.
Lock Your Fire Button Before Pocketing: A single accidental 8-second pocket press against your leg or keys will instantly incinerate a brand-new coil. Always use your mod’s fire-lock shortcut (usually 3 or 4 clicks) or 5-click power-off before sliding it into a pocket or bag.
Release the Button a Split Second Early: Keep inhaling for half a second after letting go of the fire button. Pulling cool room air across the mesh grid clears hot lingering vapor and drops coil temperature immediately.
Avoid Aggressive High-Sweetener Blends Back-to-Back: If you love rich vanilla custards or hyper-sweet blue raspberry salts, alternate them with a clean mint or crisp fruit pod to prevent rapid sucralose buildup.
Reset Wattage Manually After Swapping Coils: If you switch from a 0.4Ω pod (28W) to a 1.2Ω pod (12W) on an adjustable pod mod, always verify the screen lowered wattage automatically before inhaling—firing 28 watts into a 1.2Ω coil will burn it out on the very first draw.
- Fixing a Burnt Coil Taste: Prevention
Final Verdict
Fixing a Burnt Coil Taste starts with knowing what is happening inside your cotton: if you catch a mild dry hit early, stopping immediately, refilling, taking unpowered primer puffs, and lowering wattage can save the wick. Once organic cotton has physically scorched from firing dry, however, installing a fresh coil is the only real fix. Fixing a Burnt Coil Taste: Prevention
Make proper priming non-negotiable—drip e-liquid directly onto sub-ohm cotton ports, wait a full 5 to 10 minutes before firing, break new coils in gradually from the bottom of their wattage range, match 50/50 vs. 70/30 viscosity to your hardware, and never let liquid drop below your wicking ports. Follow those habits, and burnt hits become a thing of the past. Fixing a Burnt Coil Taste: Prevention
Frequently Asked Questions
Can you actually fix a burnt vape coil, or do you have to replace it?
Once organic cotton fibers inside a coil or pod have physically scorched and turned black from firing dry, no amount of soaking or rinsing can reverse carbonized cotton—you must install a fresh coil. However, if you catch a mild ‘dry hit’ immediately before the cotton chars, resting the tank for 10 minutes, lowering your wattage, and taking unpowered primer puffs can restore clean flavor. Fixing a Burnt Coil Taste: Prevention
How long should I wait after priming a brand-new vape coil or pod?
For refillable pod cartridges using 50/50 VG/PG e-liquid, wait at least 5 to 8 full minutes after filling before taking your first puff. For larger sub-ohm mesh coils using thicker 70/30 VG/PG liquid, drip 4 to 6 drops directly onto the exposed cotton ports first, fill the tank, and wait 8 to 12 minutes. Fixing a Burnt Coil Taste: Prevention
Why does my brand-new vape coil taste burnt right away even after waiting?
A brand-new coil tastes burnt immediately for four main reasons: wattage was left too high from a previous lower-ohm coil, thick 70/30 high-VG liquid was put into a tight MTL pod designed for 50/50 juice, an airlock bubble blocked liquid from entering the wicking ports, or the fire button was pressed accidentally in a pocket before filling. Fixing a Burnt Coil Taste: Prevention